Wednesday, June 30, 2010

Friday, June 25, 2010

My Craft Room Tour Videos!

Here are two of my videos for my craft room. I have some more footage that needs to be edited, so stay tuned!


Thanks for watching!

Wednesday, June 23, 2010

My First Video!!!!!

I am still working on how to use my video editing software. So my first video is a just a "Haul Video". My Photo Elements software is being difficult, thus I had to use Microsoft Video Maker. I hope you enjoy! Thanks for watching.

Sunday, June 20, 2010

Happy Father's Day!

Another Late Night of Watching YouTube Hoping to be Inspired!
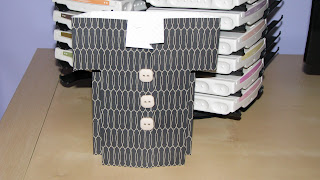
When the creative juices are not flowing or I would like to add a new technique to my card making repertoire, I love to watch some of the talented ladies on YouTube. I take their ideas and tweak them to suit my purpose. A lot of people call it "scraplifting". From what I understand it is perfectly acceptable, as long as you give credit to the person(s). It is kind of like citing your sources when writing. I will have to show my students this post, so they understand how giving credit can transfer to other parts of their lives. Here is what I came up with...

Work Cited

Click on the links below to see the YouTube videos that inspired the cards above.

How to make the oragami shirts

How to make the gate card

How to make the shirt card with the buttons

Friday, June 18, 2010

Pictures of My Purple Craftroom!!!

I finally had the time and $$ to fix up my spare bedroom. It was a chore, and it took way longer than I anticipated to have it completed. There are still a few things that need to be done. Once I do that, I will upload a video to my favorite website...YOUTUBE. Almost everything was bought at IKEA or I already had it. I painted the room purple because it is my favorite color. I think it turned out amazing. I am so happy to have it almost complete. I need to have my crafting buddy over, so I can see that my hard work was not in vain...lol...just kidding.

********************************************************


This is my cricut station. My cricut sits on my dresser with my Bose and iPod. On the left are some plastic drawers I bought at JoAnn when they had 50% off plastic storage. Add my teacher discount and viola... a good deal. I keep extra adhesive in one and my cricut tools in the other. On top of the drawers I have some cute boxes that I have had forever. One has cords for my cricut, gypsy, iPod, and computer. The others I put miscellaneous items inside.

My cricut has a nice little cover I ordered off eBay...I think it is called The Ribbit. They didn't have purple, but it is still cute. It really helps to keep the dust off it, and detours little hands from trying to play with it.

Above the dresser, I hung up the Grundtal towel bars from IKEA and put my punches on it. I saw this idea on you guessed it...YouTube. Here is the link to Kerry's video and her craft room storage ideas(lol...I used her first name, but her and I do not know each other like that). The bottom towel rack I hung some of my new embellishments with the S hooks that IKEA sells. Plus, I found these adorable cups in purple at IKEA that fit nicely on the bar that has little odds and ends in them. The large black circle is a magnetic board that IKEA sells. I actually have two in my room. What a great way to use wall space! I use the magnetic spice containers for different embellishments.

***************************************************


This is the second magnetic board that sits above my desk. I have some empty (not for long) magnetic spice containers. I attached my stickles to the bottom using Velcro. I have heard many people saying that the stickles work better if they are stored tip down, so I thought I would give it a try. Also, it is more likely I will use them if they are right in front of me.

*******************************************************

This is my little unit from IKEA. I fell in love with the pattern of the cloth boxes. I bought the drawer units to put in, so that I could have some hide-away storage. The drawers pull out nice and smooth and they are easy to put together.


*********************************************************


On top of the unit I have my Stampin' Up ink caddy. Temporarily I also have my boyfriend's TV in the room. He uses it as his computer screen for his music, but my sister and her fiance were in town, and he put in the room so they could watch TV. Isn't he sweet to let me keep it for a while...possession is 9/10 of the law...hahah!
******************************************************


Here is quick shot of my closet. I have paper, laminator, Your Story machine, embellishments, sticker machine, stamps (99% of them have been clear mounted and housed in the Stampin' Up cases...which I LOVE!!), photo boxes, envelopes, Bind-It-All accessories, and anything else I could shove in there.
I hope you enjoyed my pictures. I will get my act together soon, so I can post my video! Have a spectacular day full of inspiration and peace.

Friday, June 11, 2010

Baby Shower Centerpieces


A lady I work with asked if I would make the centerpieces for a baby shower she is hosting for a friend. Since I haven't posted in a very long time, I thought I would put the pictures up. The turned out AMAZING!! The flowers are actually pens.


Recipe:

Fake Flowers Roses-Hobby Lobby

Floral Tape- Walmart

Pens- Office Max or Sam's Club

Glass Rocks- Dollar Tree or Hobby Lobby

Vases- JoAnn's

Pink Ribbon with Wire-Walmart

Baby Shower Signs- Wild Card Cricut Cartridge

Stickles-Michael's

Red Sticky Strip- Michael's


Once you have found your flowers, hopefully you got them on sale or used a coupon, cut the flowers off the bunch using wire cutters. Make sure you have at least 3 inches of stem, so that you can attach the flowers to the pens with ease. Cut off any extra baby's breath or small flowers, so that you may use it for added decoration (the small white flower are just placed in the vase to help fill out space).


Use the floral tape and wind it around the pen attaching the flowers to the top. Make as many as you would like. I made 12 per vase, so that each person at the table(8) could take one pen and the person who won the centerpiece could have 5 pens in their vase for their desk at work or home.


Add the decorative rocks at the bottom of each vase.


Add ribbon using red sticky strip.


Add decorative sign.


Blogs I Follow